Wednesday 30 March 2016

Background Projects - layouts from disney


Lilo and Stitch - the Beach (1)

the background itself to around 8 hours, using photoshop and several layers. but the layout itself is quite simple in form yet effective. you have the foreground - the animating area, the mid ground is the sea and the background is the sky. the lines between the three different sections are quite distinct, in that the horizon meets the sea with a bright yellow, opposite to blue on the colour wheel and therefore creating the biggest contrast, while the sand is a blood orange, darker, yet still far enough from blue on the colour wheel to create a crisp line between the fore- and mid-ground.


 Alice in Wonderland - the White Rabbits Home. (2)

this was the only one of 5 which i created with pen and paper rather that digitally. i spent some time roughing it out in pencil and paper before pushing into the acrylic paint. the process was much longer than the digital pieces (mixing paint, waiting for it to dry before you can apply the next layer... you get the idea)  the layout is rather odd in this piece, the layout suggests the animation will occur in the mid ground, say a character running or walking from the door and up the stairs (or the other way around), just because of the line between them. there is no real background in this piece, but the foreground is most defiantly the area furthest forward including the rug and table, anything in front of the staircase. 


(images went missing sorry)

Mulan - Garden Temple (3)

the first image is the original, i semi traced this piece (the dog). this Disney background has a distinct mid- and back-ground but the foreground seems to have been cut out. the mid ground being the temple and Little Brother (the dog), and the background being, well almost everything in the second image below. the background as a whole leads your eyes up the stairs and into the darkness of the temple, but with the dog included, he becomes the focus - what with him being a character.


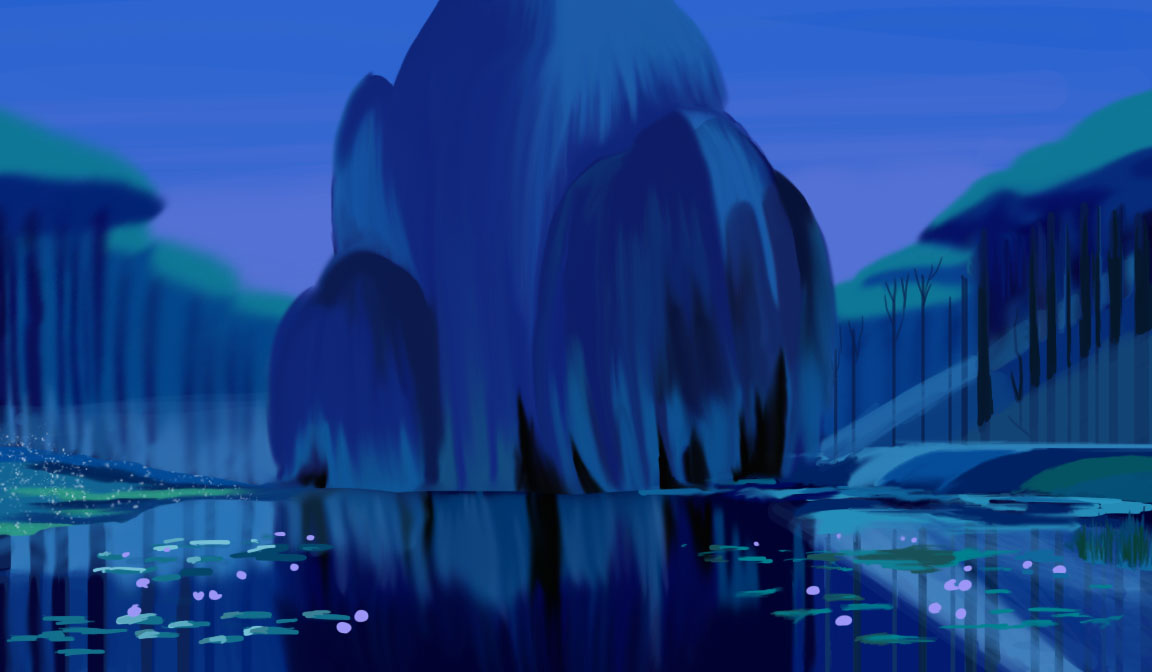
 Pocahontas - Some Tree Scene (4)

image 1 is my recreation of the second (original) image. as you will see from image 3, the foreground consist of the pond only, the mid ground included some of the pond as well as the weeping willow (which seconds as the focal point) and the banks. the trees on the sides, along with the sky make up the remaining piece -  the background. the trees on the edges are not only blurred to deter attention, but also descend in height - this is for two reasons, the first to aline with the vanishing point behind the centre of the weeping willow, and second, to guide the audiences eye to the willow tree. Even the light source on the right side of the screen and its reflection smoothly flow towards the focal point. 


Urbex pt2

you can see from the staged renders, that my 3d environment is coming along nicely. I incorporated ideas from the windows with that of a staircase from another reference image as well as adding pillars into the mix.  i spent a good deal of time organising the outliner in my last class as well as getting to grips with the duplicate shortcuts, my favourite being shift+D to duplicate with a transformation - helped a lot with the staircases and then the window muntins (the panels between the glass in a mosaic glass window)

the next stages will to comprise of making furniture, maybe a piano along with some stools and chairs scattered around, then texturing and lighting will follow once the modelling stage is complete. 


Monday 21 March 2016

Backgrounds from Disney


 so, Image 1 is the rough sketch, Image 2 is bold colours and some defined lines, image 3 contains more detail, and image 4 is the original disney snapshot.

Wednesday 16 March 2016

Revamping Old Work

so for my Background project with Kathy, we have been set to spruce up some old work, stuff that could just use the extra touch since we've all been at university.

now i hadn't brought much old work with me, so i looked at an old sketchbook and found some drawings i did when i was rather tired and made them a little more proper:


so above is Jaq from Cinerella, and below is a drawing of a sculpture from the Eden Project trip, both originally scrappy oil pastel drawings, but now transformed by acrylic paint.


Thursday 10 March 2016

Penryn 800 - Map Animation Stage 3 video


so this is Stage 3 of my map animation. The first stage was a simple outline, with some river lines drawn in, Stage 2 was a basic blocking out of the animation, and Stage 3  is now, basic animation of the map.  I added the Cornwall Emblem with English Lion and Unicorn as an addition to the shield that i will eventually animate.

stage 4 will be a cleaner animation of the map moving in, then i will add waves moving, maybe a sea serpent, some ships in the following stages.  Eventually  I will be moving this into after effects to create a Harry Potter like effects, with some fires burning instead of footprints.

Wednesday 9 March 2016

The Pokemon Project - Day 9


So, this Blastoise didn't take as long as the first Bulbasaur did, which I guess, means I'm improving. I discovered the perks of the smudge tool today, as well as the many downsides to it. I didn't give him fangs because he looked too scary, but now with the angry anime eyes i feel like he looks a bit conflicted, like he's kind of cute but yet... not so cute.. it confuses me, but facial expressions have never been my strong suit, something to work on for next time :)

Wednesday 2 March 2016

The Pokemon Project - Day 4


Urbex pt2

so this is how it begins. a flat plane, a big ass wall and two sloped walls at 81.5 and 98.5 degrees from the main wall. 
I designed an arch by creating a pillar from a cube, removing the top face, duplicating it, then double clicking both top rings (where that face i just deleted was), mesh, combine, edit mesh, bridge (option box), curved (not linear), then played around with the shape of the arch until i created a shape i liked.

the next step was a little more tedious.. i used the edge loop tool.. a lot. to create faced to delete in order to open up a hole for the window. not sure i want it all the way to the ground any more, but a problem for another day i guess. it did take a long time to make the window, the way i did, but I'm sure theres an easier way to go about it, which i will be asking my teacher about next class :)

The Pokemon Project Day 3

Venasaur 


New Website

New Animation Website